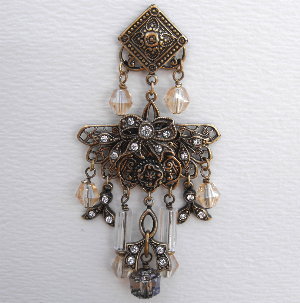
Earrings with tiny rhinestones add just the right touch of sparkle near your face.
These earrings feature some of our items which hold tiny pointed back rhinestones. I used stones measuring about 1.6mm up to 2.5mm in this example. They are pp10 and pp18 size stones (pp stands for pearl plate and ss means stone size. This is how rhinestones are measured.)
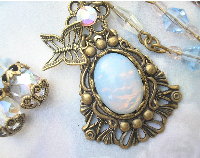
Connector #B11 was cut off as shown and used under #W138X to create the earring top. I glued our post back #A10 to the back.
I used our fan #A729 to create the dangle area. I first added #B11 turned upward to create the hanging loop. Next I layered #CC13X, #T126X and #C91X.
The beads and dangles include other items from our site.
This same layering method can be used to create an endless variety of styles and designs. Keep in mind the scale and design periods as you combine items. Repeat a pattern throughout the piece to tie it together. I used the little round button to tie the dangle design back in with the pattern of the earring top. Even if it isn’t the same as the top, it is similar in pattern and attitude.
How to set Tiny Rhinestones
Use a needle tool or toothpick which has been dipped into the tiniest amount of fresh E6000 glue to touch the back of the rhinestone. The face down stone will adhere to the glue until you can load it into the setting turning it point down as you approach the well. Push the stone into the setting well and leave it for a few hours. It only takes a small speck of glue to hold tiny stones. There is no need to try to put glue in the well also. I find it easier to use the needle tool to guide the stone to the well and then push into place with my finger.
If you make a mess with E6000, go back to the project in an hour and gently rub away the cloudy glue. You can always start over with that one stone which might come lose during the clean up process.
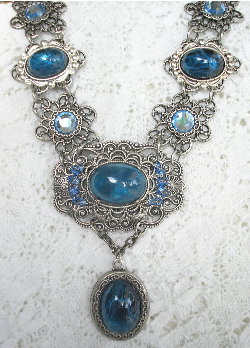
Necklace by Melania Jackson of www.groovymooncreations.etsy.com
Settings with Prongs
Sometimes you have to gently open the prongs just a bit, in order for the stone to fit down onto the tiny rim of the setting on which it will rest. Some settings are meant for oval or pointed back stones so you may not be able to get a flat back stone to fit into them. Flat back stones have a sharper edge which allows the stone to fit into the exact size flat back setting. Rounded back or pointed back stones have a gentle slope to their edges so that they can fit into the open back settings.
Another tip: When you are using a deep well setting with a closed back for pointed back settings, the stone will rest on the almost invisible rim of the setting just under the prongs, not all the way down into the setting as one might think at first.
Necklace and earrings by Willie Zuniga of www.MorningGloryDesigns.etsy.com
Visit our store web site VintageJewelrySupplies.com
(NOTE: our website best viewed on desktop or tablet)