When you join several parts together into a single piece you may not be happy with how one of the parts blends with the others. Perhaps you bought the components from different suppliers who use different platers and one piece is brighter than the others or you would like to make the whole piece look older. The following technique will help you to achieve that look.
YOU WILL NEED:
1. Flat black or brown water base craft paint.
2. A small paint brush (about 1/4 inch wide)
3. A soft toothbrush
4. A soft cloth that you don’t mind throwing away or paper towels
5. Extra fine grade steel wool pads
Directions:
1. Paint the whole piece with the craft paint. (Glass stones will not be harmed but be cautious about porous gemstones that may become too dark.) You can also just use a smaller detail brush to put the paint only where you want it.
2. Immediately use the cloth or paper towel to remove as much of the paint as you can.
3. Use the soft toothbrush to remove more paint until you achieve the amount of antiquing you desire.
4. Let dry for an hour.
BUFFING
When you buy a plated item which has retained too much antiquing and is just too dark, you can use a fine nail buffing stone from the beauty supply department or extra fine grade steel wool pads to gradually remove the amount of antiquing you desire. Please note that you will also be removing the protective lacquer finish applied to most plated items. I’ve found that it is much wiser not to obsess so much about a perfect level of antiquing on all components.
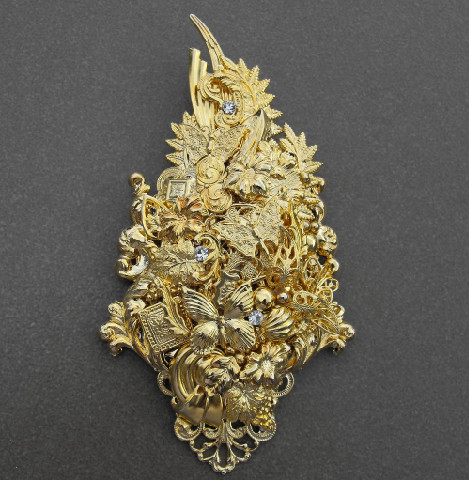
Example
This is a brooch from my sister’s collection of pieces which I made in the early 1990’s. At that time 24 K gold plating on pieces was all the rage. Glitz was everywhere!
It will be perfect to show you an example for adding antique patina to items which are just too bright.
I often incorporated found objects or other pieces of jewelry into a piece. You will not want the eye to be drawn to that oddly bright object you may have used for it’s shape or theme. Adding antiquing will help to tone it down and unify the piece.
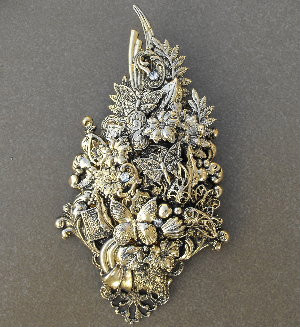
Here you see the result of using this antiquing technique on the brooch, making it much more desirable.
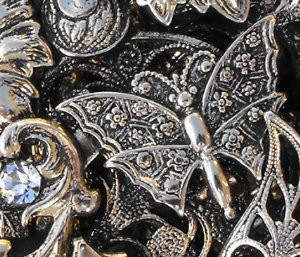
This is a close up shot of the piece after antiquing…
Adding patina to raw brass (natural brass).
For those of you who would like to try adding your own patinas, we do offer some items in raw brass. There is an easy way to add patina in an eco friendly way. Be sure to clean the brass of all oil and manufacturing residue by soaking it in a bath of vinegar and salt for a couple of hours. Don’t let the items touch as they are soaking. Wash the pieces in cool running water, dry them right away and lay on a baking dish or cookie sheet in a single non-touching layer and bake for an hour or so at 450 degrees. When you are happy with the depth of color on the pieces you can use a coarse cleaning cloth to buff them a little to bring back some of the brighter color at the surface of some of the design. Lastly you will need to seal the piece with lacquer. When people tell you that they have aged the brass in their studio…this is often the technique they used.
One of our clients, Kristina Olson, shares these tips with you. “I discovered a better way to turn the color of the oxidization from brown to black. I had no paint but I had rit dye and I was impatient so I tried dropping one of them in dye. I ruined a few, but discovered that hot, but not boiling dye and no more than 8 seconds will turn a brown filigree to the exact shade of grayish black you see on the website. And I also discovered that if I ever want black filigree I can just drop a filigree in the dye water and boil it for a while and it won’t come off at all.”
Renaissance Wax is a great product to use to protect the patina you have achieved. It was originally developed in the British Museum in the 1950’s to clean, restore and protect valuable museum objects and collectibles. It’s about $30.00 for a tub.
Diamond Glaze™ by JudiKins, is good to use with art work, scanned images or stamped work. Diamond Glaze™ is a dimensional adhesive that dries to a clear glass-like finish. You will love using it with any of our settings. It securely holds Vellum, glass beads, glitter and many other mediums. Unlike other clear adhesives, Diamond Glaze is mixable with dye-based inks, watercolor, and pearlescent pigments. This dimensional adhesive dries to a clear glass-like finish. You can use it directly over your artwork to create a raised finish, or use it as a glue to attach beads and glitter. Diamond Glaze is water-soluble when wet, but once dry, it is permanent, and difficult to remove. The manufacturer recommends covering any work surface while using this product. A thin layer will dry quickly, but a thicker layer may take hours to dry, depending upon the humidity. It comes in a 2 fl. Oz. bottle, with a fine tipped applicator. This product is offered for sale at www.Stampington.com. (SKU: 5JK-DIAMOND2)
We may earn a small commission if you make a purchase from 3rd party links above at no additional cost to you.
Visit our store web site VintageJewelrySupplies.com to shop for these and thousands more items.
(NOTE: our website best viewed on desktop or tablet)