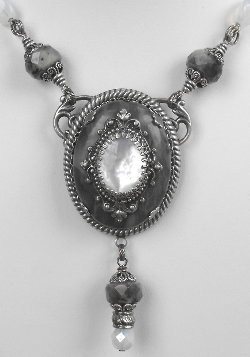
It’s fun to create beautiful jewelry from found objects and all sorts of available materials by using the technique of layering, combined with a bit of artistic ability and ingenuity. This was always the technique I favored during the ten years I earned my living as a designer.
The overall effect is elegant and the layers lend a bit more substantial weight to your work. I used an endless combination of textures, color hues and materials. At times I also hand painted the metal pieces to define them even more. The point is that you shouldn’t limit yourself to using items only in the way they are presented to you. Think of the items shown on our site as the parts of a puzzle or as building blocks. The way you combine and layer them creates your own unique work of art to wear. For example, in the necklace shown, I used a vertically drilled bead as if it were a cabochon. It’s your creation so you may use whatever method necessary to achieve the effect that your imagination tells you is pleasing.
To create the necklace shown, I used several items currently offered for sale on our web sites. (The item numbers are listed below in parentheses.)
Products and Instructions
E6000 glue (#A04) was used to mount a 40x30mm gemstone pillow shaped oval bead into the setting frame combination of a simple smooth pronged setting (#T47) glued onto a rope edged setting (#CC56) with the loop facing downward. There is a tiny silver plated cable chain (#A746) glued into the space where the two settings were joined. This little trick fills in the empty space where you glued the two settings together and adds a more finished look.
To the back of the setting an ornate flat stamping (#L101) was glued to give you
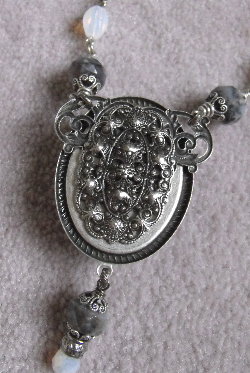
openwork from which to attach strands. To finish the back and make it look pretty also, I layered another small filigree (#A115) to hide and reinforce the former step.
Next I glued an ornate setting frame (#BB64) on top of the gemstone bead. A crown edge setting (#DD31) with a mother of pearl cabochon (#R360) mounted inside tops the gemstone bead.
Note that I used a neutral combination of colors which complement each other without actually matching. This pleasing neutral color combination also allows the owner to wear this necklace with a variety of clothing styles and colors.
When you are careful to match each bead, jump ring and headpin, the overall effect is one of being made by a machine or an assembly line rather than the hands of an artist with a unique vision. The difference in hues in the metals used and the variety of colors in the cabochons and beads adds to the aesthetic appeal and of the design. Don’t avoid mixing items in various colors and textures, rather embrace the rich effect which results from using a variety of materials which don’t necessarily match exactly.
Balance components
The layers of oxidized sterling silver brass plated components used in this design, were alternated between simple and ornate to avoid becoming too busy. The result is a visual overload when you layer too many filigrees or textured pieces with no smooth lines in between. Remember to balance textures and lacy filigrees with smooth edges.
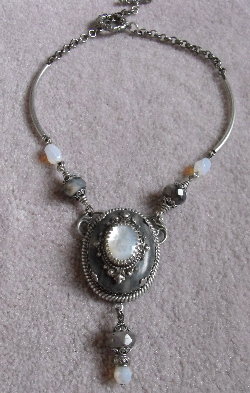
Repeat variations of color
Repeat the hues of colors and textures throughout the beading strand so that it is related to the pendant. Keep scale in mind as you join the pieces together. A tiny jumping will not be visually or physically strong enough to join bold pieces.
I used single links of oxidized sterling silver plated steel rollo chain or double jump rings to keep the scale of this necklace strand in line with the pendant. Hollow tube beads called noodle beads in oxidized sterling silver plated brass allow for smooth sleek lines as well as a functional curve to the strand. A variety of bead caps layered onto related bead colors finish out the remainder of the strand which supports the focal point pendant.
More about E6000
I’ve used E6000 glue exclusively for many years to join metal to glass, as well as gemstones, leather, wood and a whole host of other materials. I’ve even glued a table top to a base with it. Even after years of use they are still attached.
Always allow the E6000 glue to set up for twenty-four hours before gently folding prongs into place. If you use this glue straight from the tube or a plastic applicator tip while it’s clear and very stringy, you will literally have to use pliers to force pieces apart after they have been allowed the proper curing time. Always use glues, paints or any other chemicals in a well ventilated area.
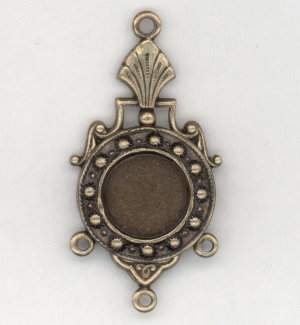
When the setting you like has no loops.
Easy layering can give you the look you want and the size of setting you need. Here’s an example:
To make this setting connector I used two pieces glued together…
#S280 Arts and Crafts Style 10mm Oxidized Brass Setting and #A199 Three Strand Connectors Keyhole Detail Oxidized Brass.
You can always clip off extra rings if you don’t want to use them.
Visit our store web site VintageJewelrySupplies.com to shop for these and thousands more items.
(NOTE: our website best viewed on desktop or tablet)