Functional elements such as bails and clasps are required for every project to make the piece wearable. Consider a pendant without a bail for example. The pendant would not face forward if you simply threaded a ribbon or chain through it’s loop. Standard loops are attached to the top of the setting or stamping with the hole facing the same way as the setting, so a bail is needed to join the chain to the pendant loop.
A bail is often the least attractive component in an otherwise fabulous design. A pretty pendant is missing something if only a simple large rather ugly jump ring is used as a bail.
Failing to consider the style of these elements can ruin the balance of an otherwise beautiful piece of jewelry. Every part should complement the main focal point. As in architecture and interior design there are periods that blend well and those which simply do not.
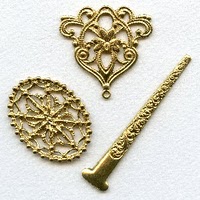
In this lesson I’ve included some of the new raw brass pieces. Raw brass is a great base metal which allows you to experiment with design elements, patinas and even soldering if you wish.
The items pictured above were joined to form the base for a dramatic pendant. The long narrow embossed piece was formed into the shape of a bail and joined to the triangle with a loop and the openwork oval. I trimmed away some of the wide flat end so that it wouldn’t interfere with the lie of the next piece.
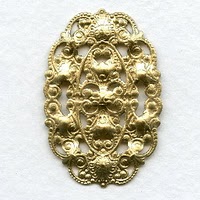
I added a smaller oval filigree to the back to both cover the glue and reinforce the point where the pieces were joined. Remember to make the back of your piece as pretty as the front.
When you are happy with the basic shape of the pendant you have created, let the glue set for a full 24 hours.
If you will be adding stones to your pendant you should add settings or bezels to hold the stones. Proper mounts or settings not only protect the stones, they add a finished more professional look to your work.
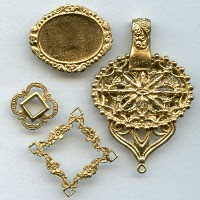
To ensure the settings have a level place to rest, you may have to add a few more elements to the base for stability. The openwork square was the right shape to give the setting a more solid fit.
The next step will include adding patina so the glue must have enough time to completely cure. I used E6000 glue so I allowed the project to air dry for a full day before proceeding. In this case the aged patina is achieved by using flat black craft paint. You can experiment with numerous colors of paint but I like the look of aged gilt.
I applied paint to the whole piece and right away used an old cloth to wipe away most of the paint. The next step is to use a soft toothbrush to remove even more of the paint. When you have achieved the level of antiquing you desire, you must seal the brass to preserve the finish. There are several products you can use for this, but our Renaissance wax polish is among the best for this purpose. Raw brass is great for manipulating and adding your own patinas but if you fail to seal the piece it will eventually turn to colors you may not like.
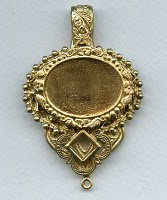
Now that you have assembled, antiqued and sealed your pendant you may add the beading, stones and chain. Your work of art is ready to enjoy.
(List of materials by item number used in this project from)
R126A
T134A
T138A
A349R
G32R
M17R
S141R
W82R
R559
R257
T105A
L26
S27
T23
T105A
T208A
A04
WX65
Visit our store web site VintageJewelrySupplies.com to shop for these and thousands more items.
(NOTE: our website best viewed on desktop or tablet)